Many people are not aware of the importance of replacing gutters. When water is allowed to pool up at the bottom, it can cause significant damage to your home. This guide will help you understand why you need to have your gutters replaced, what types are available for purchase, and how long it should take for an experienced professional with the right tools to replace them.
Contents
What Is Guttering?
Guttering is a system that collects rainwater from the roof of your house and diverts it away from the foundation. It is an important part of your home’s drainage system, and if it isn’t working properly, you could see some serious water damage.
The gutters on your home are responsible for funneling rainwater away from the foundation and down into the storm drain or yard. If they become clogged with debris or if they are damaged in any way, water can pool up near the base of your home and cause extensive damage over time.
How Do I Know When My Gutters Need To Be Replaced?
One common sign that you need to have your gutters replaced is when they start leaking. If you notice water dripping down the side of your house, it may be time to contact a professional.
Another sign is when the gutters begin to sag or form gaps that allow water and debris through. You can check your current system by looking for clogs, holes, cracks, and sagging sections of the gutter.
There are several things you should look at on an annual basis to determine if your gutters need replacing:
- Look for any leaks near where they attach to the house (if there’s water damage around this area, call someone immediately)
- Check all joints along each side as well as those between downspouts; tighten these with metal pliers if necessary
- Inspect for rust and deterioration, especially on galvanized gutters
- Clear any debris that has built up in the gutters (a garden hose can help with this)
- Look for broken or missing pieces; if more than 50% of the gutter is damaged, it should be replaced
If you’re unsure whether your gutters need to be replaced, contact a professional to take a look. They will be able to tell you if there is significant damage and whether a replacement is necessary.
Types of Guttering Available For Replacement
There are a few different types of gutters available on the market, and choosing which one is right for your home will depend largely on how much you want to spend as well as the design of your roof. Here are some common options:
- Aluminum guttering: comes preformed in various sizes with visible seams; relatively inexpensive but may dent over time
- PVC/ABS (plastic) gutter systems: very low maintenance but can be expensive; look great if installed properly
- Copper Gutters: high-quality metal that performs better than aluminum or plastic but has higher installation costs due to weight and required tools. Gutters made out of cast iron tend to last longer than any other material, but they are also the most expensive.
- Galvanized steel: galvanized metal has the highest resistance to corrosion but will still require regular maintenance to prevent rusting; available in a variety of styles including round or half round.
Guttering Profiles
There are several different profiles for gutters, and each one is meant to handle a specific type of rainfall.
Flared/narrow
Typically used on homes with lower roofs that have no overhang; rainwater falls straight down into the gutter without splashing off the sides
Half round/oval
 The best option when you want something that looks similar to standard aluminum or galvanized steel but is more resistant to rusting due to its galvanizing process; can be expensive depending on style (such as half round) chosen
Rectangular/round
A great option if you don’t mind some water spilling onto your foundation because it has large openings which allow heavy amounts of rain in without clogging easily; also comes with a great warranty for the most part
Square/flat
These gutters are meant to be used on high roofs that have little or no overhang; water will pool up in them if they aren’t angled properly
Vented
Usually made of aluminum, vented gutters come preformed and attached together so installation is easy. They have larger openings that allow more rainwater into the gutter but can easily clog up thanks to debris. For this reason, you should clean your gutters three times per year (more often than not) using soap and water with a garden hose. If it doesn’t look like there’s anything stuck inside after an hour or two, then there probably isn’t.
K-style
This is the most popular style of gutter and can be made from a variety of materials. It has a deep trough that helps to prevent water from spilling over the sides, and it’s also very resistant to rusting
If you’re not sure what type of gutters are on your home currently, take a look at the eaves or fascia – this is where they will typically be attached. If you see metal brackets along the roofline, then there’s a good chance you have galvanized steel gutters. Half-round gutters are easily identifiable because they have a semi-circular shape. Rectangular/round gutters usually have more than one downspout.
Guttering Components
In addition to the profile and material of your gutters, you’ll also need to consider the components that come with them.
- Downspouts: these are what channel water away from your home; choose a style and size that will be compatible with your gutters
- Gutter guards/covers: this help keep leaves, twigs, and other debris out of your gutters so they don’t clog; some people find them helpful while others think they’re a waste of money
- Overflow tubes: installed on homes that have flat roofs or low eaves, overflow tubes direct excess rainwater away from the foundation or into rain barrels to be used later
If you’re in the market for new gutters, you have a lot of options to choose from when it comes to style, material, and components. For the best results though, talk with a local contractor about what type of gutters they recommend for your home.
What Tools Will You Need to Remove Guttering?
- Ladder
- Hammer
- Screwdriver
- Wrench or pliers
If you’re replacing your gutters, there are a few tools that you’ll need in order to do the job properly. A ladder is essential for accessing the roof, a hammer and screwdriver will come in handy for removing old gutter brackets, and a wrench or pliers can be used to loosen any screws or bolts. Some people also find it helpful to have a power drill with a Phillips head bit on hand.
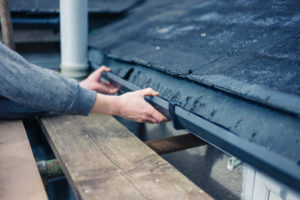
How to Remove Guttering
Use your ladder to climb onto the roof
Once you’re safely on the roof, look for brackets that are holding gutter sections in place. You’ll likely have two or three located at equal distances from each other near where your downspouts drain into gutters.
Loosen and remove any screws/bolts using a screwdriver or wrench
Using either a screwdriver with an appropriate head or a wrench will work just fine here depending on what type of fasteners are being used to secure them in place. It’s important not only to remove old brackets but also to keep track of which pieces were removed because they need to be reused when installing new ones – don’t worry though; it won’t take very long!
Gently pry the gutter away from the roof with a hammer
Once all fasteners are removed, give the gutter a few taps with a hammer until it pops free. If there’s any resistance, you can try using a screwdriver or pliers to help get it started. Take care not to damage your roofing material in the process!
Repeat these steps for each section of guttering
There may be anywhere from one to four sections of guttering on your home, so repeat these same steps for each one. Be careful not to drop screws or other small pieces into the gutters or downspouts – they can be difficult to retrieve if they fall inside!
How to Fit the Gutters
Measure the length of your new gutters and cut them to size
If you’re replacing old guttering, then measure where they used to sit. If there’s no existing gutter in place, or if it’s shorter than expected, go ahead and mark where you think is best with a pencil so that pieces are evenly set on either side of downspouts.
Place brackets according to measurements on the roof
Place one bracket near each end before attaching new pieces; this will help keep everything secure while ensuring that ends line up properly at intersections later on.
You may need someone else for assistance here depending on what type of tools you have available! It can be dangerous standing on an unstable ladder leaning against a slippery roof – don’t take any chances.
Insert screws/bolts and tighten
With brackets in place, it’s now time to insert screws or bolts (depending on what type was used before) and have someone help you tighten them up. Don’t overtighten as this can cause damage over time – just make sure everything is snug against the roofing material and gutter sections.
Repeat for each section of guttering
There will likely be two or three brackets per section, so go ahead and repeat these same steps for each one. You’re almost done!
Install overflow tubes if necessary
If your home has low eaves or a flat roof, then you’ll need to install overflow tubes to direct rainwater away from the house. These should be attached to the gutter sections before brackets are secured in place.
If you’re using new pieces that don’t include them, then consider adding one or two yourselves by cutting a hole into each piece around the opening and filling it with plastic tubing (try not to damage gutters when doing so).
Connect guttering sections at intersections
Connect smaller gutter sections together as needed until they meet up properly for joints between larger ones; this can take some time but it’s important because having leaks is never fun!
Since these areas will likely have several screws/bolts holding everything together, make sure there aren’t any gaps where water could potentially slip through – if there are use caulk or another adhesive material to seal things up.
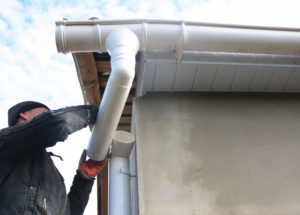
Finish up by attaching downspouts
The last step is to attach your downspouts and direct the water away from your home.
How to Install the Downpipes
Use a level to ensure they’re all straight
To avoid having water pooling around your house, it’s important that the downpipes are installed properly and aimed away from anything you don’t want wet. Attach them as close as possible to where guttering is attached at each end of roof – this will help keep any additional damage or leaks from occurring due to poor drainage.
Secure with brackets & screws/bolts if necessary
As mentioned before, some homes have low eaves which prevents rainwater from going downhill fast enough on its own; in order for this process to be effective, attach one bracket on either side of these areas about 12″ up. This way there’s no chance of things shifting over time without proper support.
Repeat for each downpipe
Similar to guttering, there will likely be two or three brackets per downpipe. If you’re using a pre-made piece, then it’s likely that they’ll be included – otherwise, mark and attach in the same way as before.
Caulk any seams where necessary
If there are any gaps between downpipes and roofing materials (or between sections), use caulk to fill them in and prevent water from seeping through over time. It’s a good idea to do this every few years even if everything seems tight just to be on the safe side!
How Much Guttering Will I Need?
This question can be a little tricky to answer because it depends on a lot of factors, such as the size and shape of your roof, the number of stories, etc. However, to give you a general idea, you’ll need about 100-150 feet of guttering for an average-sized home.
This will vary depending on what type you choose (copper is more expensive than plastic but also lasts longer), so it’s always best to get an estimate from a professional before getting started.
If you’re not comfortable doing this project yourself or just don’t have the time, then consider hiring a professional gutter installation company. It may cost more in the short run but it could save you hours – and maybe even some bruises!
What Are the Benefits of Guttering?
Prevents water damage
 One of the most obvious benefits of having gutters is that they help keep your home dry by directing rainwater away from the roof and walls. This is especially important in areas where there’s a lot of precipitation, as it can lead to serious damages over time if not taken care of.
Reduces soil erosion
Gutters also play an important role in preventing soil erosion, which can be extremely harmful to both the environment and your property. When rainwater accumulates on hillsides or unstable ground, it can quickly wash away topsoil and create ravines – something you definitely don’t want happening near your house!
Keeps leaves & debris out of gutters
Another benefit of having gutters is that they help keep leaves and other debris from accumulating, which can cause blockages and lead to water damage. This is especially important if you have trees nearby as the leaves will likely end up in your gutters sooner or later.
Aesthetics
Guttering doesn’t just serve a practical purpose – it can also add some extra curb appeal to your home! There are many different types and styles of guttering available, so you’re sure to find something that suits your taste (and budget).
So there you have it – everything you need to know about replacing your gutters! If you have any questions or run into any problems during the process, be sure to consult a professional for advice.
Tips for Choosing a Guttering Installation Company
When it comes to choosing a guttering installation company, there are a few things you should keep in mind. First of all, make sure they have experience installing the type of guttering you want – this is especially important if you’re opting for something unusual or unique.
You should also ask to see examples of their work and read reviews from past clients to get an idea of what kind of quality you can expect. Finally, be sure to get quotes from several different companies before making a decision – this will help ensure you’re getting the best possible deal.
FAQs about Guttering Replacement
How Much Does It Cost to Replace Guttering?
This is another question that’s difficult to answer definitively because it can vary so much depending on the size and type of guttering, as well as the difficulty of the installation. However, you can expect to pay around £200-£300 for a standard replacement job – although this may increase if there are complications or special requirements.
How do I know if I need to replace my gutters?
If you’re not sure whether or not your gutters need replacing, there are a few telltale signs to look out for. Leaks, rust, and sagging are all common indicators that it’s time for a replacement.
What type of guttering should I choose?
There are many different types of guttering available, so it’s important to choose one that suits your needs and budget. PVC is the most affordable option, while metal (copper or zinc) is more expensive but also lasts longer.
Do I need to hire a professional for gutter replacement?
It’s always best to consult with a professional before starting any home improvement project, especially one as complex as gutter replacement. They can help you with everything from sizing to installation.
How much will it cost to replace my gutters?
Replacing your gutters usually costs between £200 and £300, but this may vary depending on the size and type of guttering, as well as the difficulty of the installation.
Can I do it myself?
It’s possible to replace your own gutters, but it’s a complicated process so it’s not recommended for everyone. If you’re not comfortable doing the job yourself or just don’t have the time, then consider hiring a professional.
Conclusion
Replacing your gutters is a big job, but it can add value to your home and improve its appearance. Make sure you choose the right type of guttering for your needs, consult with a professional if necessary, and follow these tips for a smooth installation.
Thanks for reading! We hope this guide was helpful. If you have any questions or run into any problems during the process, be sure to leave a comment below. Happy renovating!